
MudBun Manual
Features & Terminologies
Pleas read the info page first to better understand the features & terminologies.
Importing The Package & Building Executables
When upgrading from older versions of MudBun, DELETE the entire MudBun folder before re-importing from a newer package. File structures might have changed, and directly re-importing a new package on top of an existing one could cause unexpected issues.
There are folders specific to render pipelines: Built-In RP, URP, and HDRP. They exist in the folders MudBun/Examples and MudBun/Shader/Render. Only import the folders that are specific to the current render pipeline and leave out the rest. It wouldn’t matter in play mode in editor, but can cause errors when building executables.
Note that there are different examples in each render pipeline’s example folder. Be sure to check out all of them under different render pipelines.
Renderers & Brushes
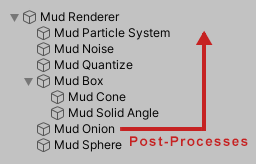
To generate volumetric VFX mesh, a renderer is needed. Brushes nested under the renderer will be processed in a top-to-bottom order as presented in Unity’s Hierarchy panel.

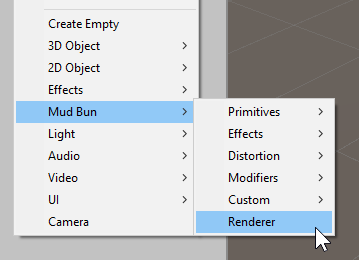
To add a new renderer, right click in the Hierarchy panel, and select MudBun > Renderer.
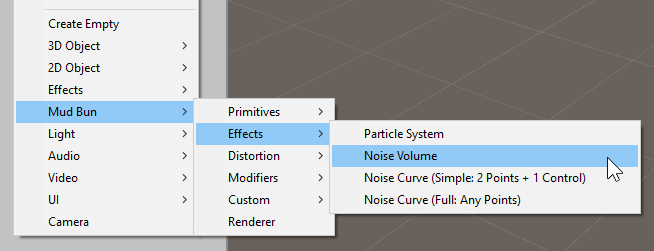
Alternatively, a renderer will be automatically created if a newly created brush is not under an existing renderer’s hierarchy. For example, creating a new noise volume brush will also create a new renderer and the noise volume brush will be nested under the renderer.
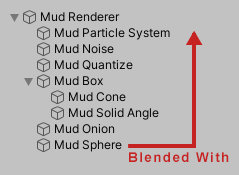
A solid brush (e.g. the Sphere brush) is blended with all the brushes above it in the Hierarchy panel.
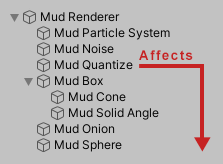
A distortion brush (e.g. the Quantize brush) distorts the sample space and affects all the brushes below it in the Hierarchy panel.
A modifier brush (e.g. the Onion brush) post-processes the accumulated SDF and thus affects the results from all the brushes above it in the Hierarchy panel.
Brush Groups
Brush groups can separate and collapse the effects of underlying child brushes. For example, an intersection brush normally would intersect with all the preceding brushes in the hierarchy, but would only intersect with its preceding sibling brushes under the same brush group’s transform hierarchy. A brush group is treated as a single brush when applying Boolean operations. Think of a brush group as a compound brush.
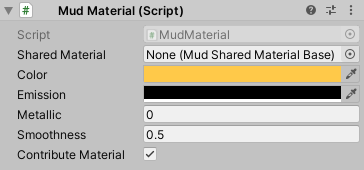
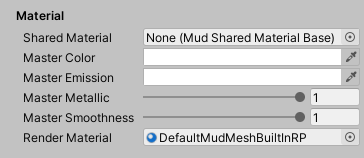
Brush & Render Materials
Each brush has its own material, as shown in its Mud Material component. A brush’s material properties, such as color and smoothness, may be adjusted in-place right within the Inspector panel. This is not to be confused with Unity’s materials that are associated with shaders for rendering.
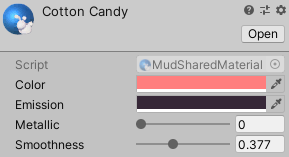
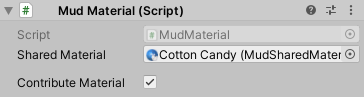
Alternatively, a shared material can be created in the Project panel by right-clicking and selecting Create > MudBun > Brush Material. Shared brush materials are stored as assets that can be shared across multiple renderers and brushes.
A renderer has some master material properties. These properties are multiplied with the final results of voxel materials. For example, setting the master color to a blue color will give the color of the generated mesh a blue tint. Same as a brush’s material, a renderer’s master material can be bound to a shared material asset.
A renderer also has a render material assigned. Different from brush materials, the render material is a Unity material and is associated with a shader for rendering. Custom shaders can be created using MudBun’s shader nodes (more details below).
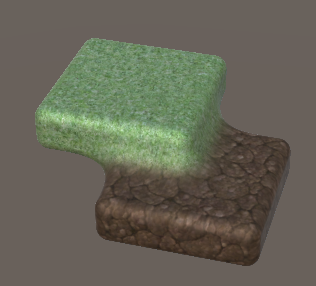
Texture Blending
In order to create texture blending, each brush needs to have a different texture index in its brush material. And the renderer needs to have a render material that supports texture blending. An instance of MudBun’s stock multi-texture render material can be created by right-clicking in the Project panel and selecting right-clicking and selecting Create > MudBun > Basic Render Material > Mesh/Splat (Multi-Textured).
Mesh Locking & FBX Exporting
A renderer’s mesh can be locked to improve performance or for other mesh-based uses. Once a mesh is locked, no more computation is done to regenerate the mesh.
There’s an option to also create a collider for the locked mesh. Since colliders typically don’t need the same details and voxel density as the rendered mesh, there’s an option to specify a lower voxel density used for collider mesh generation.
There are two renderable mesh modes for locking meshes. The procedural mode computes the mesh the exact same way a renderer generates meshes once, and locks the mesh afterwards. The mesh renderer mode generates a standard mesh and uses Unity’s built-in mesh renderers for subsequent rendering; there is also an option to enable auto-rigging using this mode (more details below). Either way, no more computation is done for regenerating the mesh after locking, and relevant GPU resources are freed up.
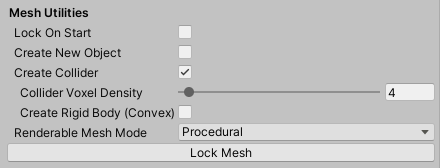
In order to export a mesh into FBX format using Unity’s official FBX Exporter package, the mesh needs to be locked in the mesh renderer mode.
Bear in mind that locking a mesh in mesh renderer mode will serialize the mesh if saved as a prefab or saved in a scene, which could greatly increase the file size. One way to avoid potential large file sizes is to keep the mesh unlocked in the editor and turn on the Lock On Start option to lock the mesh on the first game frame; or, export the mesh into the more compressed FBX format.
Auto-Rigging
When locking mesh in the mesh renderer mode, there is an auto-rigging to automatically rig the mesh using underlying brushes. The locked mesh will be rendererd using Unity’s skinned mesh renderer, and the brushes will become bones and automatically weighted. The weighting is roughly based on the distance between each vertex and the surface of brush shapes.

A brush can be excluded from auto-rigging by leaving its Count As Bone checkbox unchecked. If the brushes that make up the model are not ideal for auto-rigging, a good way to use a different set of brushes for rigging is using no-op brushes: uncheck the Count As Bone checkboxes on brushes undesirable as bones, add brushes meant to be bones, set their operator to No Op, and they will act as replacement bones during auto-rigging. A good way to visualize the effect of these no-op brushes as bones is to first set their operator to Dye, so they colorize the mesh for easy bone weight visualization.
Custom Brushes
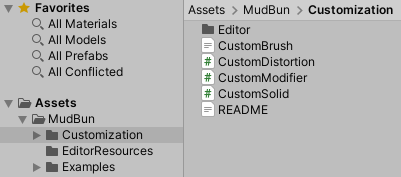
Templates and examples for creating custom brushes are located in the MudBun/Customization folder.
New custom brushes are created in 3 parts: create a brush class in C#, define the brush’s signed distance field in compute shader, and add the brush class to the creation menu.
To create a brush class, extend either one of the CustomSolid, CustomDistortion, or CustomModifier class. Two things that must be overridden are the Bounds property and FillComputeData method.
The Bounds property returns the bounding axis-aligned bounding box (AABB) of the brush, which is essential for the renderer to determine where to evaluate voxels. It is acceptable if the AABB is slightly larger than the actual shape of the brush, which will result in slightly more unnecessary voxel evaluation. But if the AABB is smaller than the brush, then some voxels will be skipped and holes will appear in the generated mesh.
The FillComputeData method fills up the brush data to be used by the compute shader and returns the number of actual SDF brushes to be evaluated by the compute shader, which is typically 1 but there are exceptions, like curves and particles. The SdfBrush.Type field must be a integer value that doesn’t conflict with existing brush types; see SdfBrush.TypeEnum in SdfBrush.cs or the defines in BrushDefs.cginc for exiting brush type values.
Next, the signed distance field (SDF) of the brush needs to be defined in the compute shader. They are defined by adding new cases on the brush type in the sdf_custom_brush function in CustomBrush.cginc. Note that re-compiling compute shaders after changing anything in CustomBrush.cginc might take a very long time, due to the extensive use of SDFs in meshing compute shaders. There are some commented-out defines at the top of CustomBrush.cginc that can be uncommented to skip the compilation of some meshing compute shaders to greatly speed up compilation for faster iteration. For example, to iterate custom signed distance fields under the flat mesh render mode and marching cubes meshing mode, uncomment all defines except MUDBUN_DISABLE_MARCHING_CUBES_FLAT_MESH. Once the iteration is complete, comment all the defines again; otherwise, the disabled render modes and meshing modes will not work.
When creating custom distortion or modifier brushes, it’s also necessary to override the MaxDistortion property in the C# class to return the correct maximum possible distortion distance of SDFs, as well as add an extra case in the sdf_custom_distortion_modifier_bounds_query function in CustomBrush.cginc to return the SDF of the bounds of the effects of the brushes. If the former is not done correctly, some voxels might be skipped and holes will appear in the generated mesh. The latter is not necessary but can greatly help with shader-level optimization. In the sdf_custom_brush function, distortion brushes are meant to modify the p variable to distort the sample point, and modifier brushes are supposed to base the return value on the res input variable, which is the accumulated SDF results of preceeding brushes.
Finally, add a menu entry in CustomCreationMenu.cs for the custom brush so it shows up in the asset creation context menu. This step is not necessary if the custom brush is only meant to be instantiated in code and not meant for in-editor creation.
Although unlikely, users might find the need to customize the bone weighting logic for auto-rigging. It can be done by adding a case in the apply_custom_brush_bone_weights function in CustomBone.cginc. The user will be responsible for properly updating the boneRes, boneIndex, and boneWeight variables, which are float4, int4, and float4, respectively. They hold data for a maximum of 4 bones for each vertex that are sorted from the most-weighted bone to the least-weighted bone; for example, the x component of each variable holds the brush’s SDF result, corresponding bone index, and bone weight, respectively. The bone transforms and indices are optionally recorded and assigned in the overridden FillComputeData function (see MudCurveSimple.cs as an example). The 4 components of the boneWeight variable must add up to 1. See the default blend_bone_weights function in BoneFuncs.cginc for a better idea on how to properly update these varialbes.
Adding/Removing Brushes via Scripts
When adding and removing brushes manually in the editor, brushes are automatically rescanned for refreshing the mesh without requiring the user to do it. This is made possible by the hierarchical EditorApplication.hierarchyChanged event provided by the editor. This event is absent outside the editor, i.e. in builds, so in order to reflect brushes added and removed via scripts in standalone builds, an extra call to MudRenderer.RescanBrushes from script is required.
CPU-Based SDF, Normal, Raycast, and Snap
Several CPU-based SDF utilities are supported for gameplay purposes: SDF evaluation, gradient/normal evaluation, raycasts, and surface snapping. They come in two flavors: synchronous (functions return only when computation is complete) and asynchronous (jobs are kicked to run in parallel to other game logic and to be gathered later). These utilities are exposed as methods defined in the MudRenderer class: EvaluateSdf, EvaluateNormal, Raycast, and SnapToSurface. These are the synchronous versions. The asynchronous versions have the Async appended to the function names.
Raycasts and surface snapping both involve ray-marched SDF raycasts, so a maximum number of steps & margin are required as function parameters to specify when to terminate the rays. A raycast is considered a hit when the ray is stepped within the margin of the SDF zero surface with less steps than the maximum number of steps. Using a low margin can require higher maximum number of steps for accurate results, which can end up impacting the performance.
Please refer to the Raycast example (HDRP) for an example of how to use asynchronous raycast jobs to pin objects at a fixed distance away from the SDF surface, as well as orient them based on the contact normals of the rays.
GPU Memory Budgets
It’s important to keep track of how much GPU memory is allocated is used. It’s good practice not to allocate too much more than what is actually needed. The renderer’s Budgets section in the Inspector panel provides an interface to adjust budgets, monitor the usage, and automatically adjust based on actual usage.
The Auto-Adjust Budgets option keeps track of high-water marks of voxel & voxel chunk usage and automatically adjusts the budgets, with the Margin Percent option for reserving an extra safe percentage of memory margin.
Allocating much more GPU memory than actually needed is not the end of the world, but this could mean that other code that also needs GPU memory might exhaust it when allocating, potentially leading to a crash.
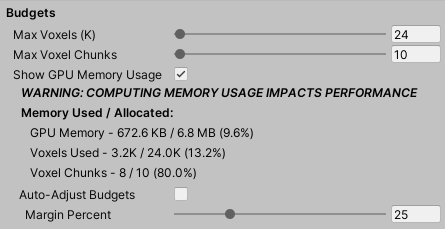
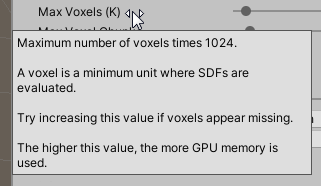
If there appears to be holes in the mesh, i.e. some voxels are missing, chances are that the budgets for max voxels and/or max voxel chunks are set too low. Check the GPU memory usage and increase the memory budgets accordingly.
Tooltips
Don’t forget that some parameters provide tooltips if you mouse-over them.
Amplify Shader Editor Nodes
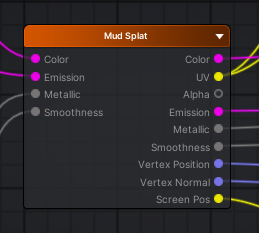
Nodes for Amplify Shader Editor are located in the MudBun/Amplify Shader Editor folder. The Mud Mesh node is for flat & smooth mesh render modes. The Mud Splat node is for circle & quad splat render modes. The Mud Locked Mesh node is for mesh renderers with locked meshes.
The default shaders for URP and HDRP can be used as references on how to hook up these nodes. They are located in the URP and HDRP folders under MudBun/Resources/Render. Make sure to open them in projects under the correct render pipeline with Amplify Shader Editor imported.
Performance Tips
In general, having too much of anything in a game will induce unnecessary performance hit. Here are a few things to look out for to get the most out of MudBun while maintaining reasonable performance.
- Keep voxel density as low as possible while still looking good. This will help with performance as well as keeping GPU memory usage low.
- Remember that the flat mesh and splats render modes are computationally cheaper than the smooth mesh render mode.
- Keep the sizes of distortion and modifier brushes as small as possible, as they can quickly eat up a lot of voxels as they grow larger.
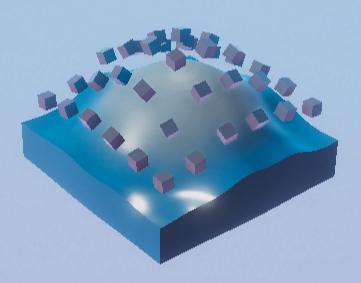
- Consider trying the splats render mode with low voxel density. It creates a stylized look, and low voxel density means good performance.
- Watch the number of particles. Each particle is treated as one solid brush. Try using higher self-blend values and less particles to achieve the same effect, or consider using noise volumes to produce similar effects.