
MudBun
Welcome!
MudBun is a volumetric VFX mesh tool for Unity. It procedurally generates meshes from non-destructive “brushes” that define shapes, distortion, and surface modification. MudBun can also be used for volumetric modeling and provides a convenient auto-rigging feature. Locked meshes, including auto-rigged ones, can be exported using Unity’s official FBX exporter package.
There are various render & meshing modes available with different styles & characteristics (more details described below). MudBun can work both at edit-time and at run-time. All VFX & models seen on this page are made entirely with MudBun within the Unity editor.
Join the Discord server to discuss MudBun and other tools!
Or visit the official thread on the Unity forums.
Originally inspired by Clayxels, MudBun was forked from an open-source research project on ray marching and optimization with spatial data structures. Relevant resources and references for MudBun’s core tech are appended at the bottom of this page.
Great Combo with Boing Kit
MudBun can be used to create organic-looking meshes, which makes it a great combo with Boing Kit, a tool for producing organic bouncy effects.
Compatibility
- Unity 2019.4 or newer.
- Windows is the only platform under active development, maintenance, and testing. Non-Windows platforms are not guaranteed to run MudBun at run-time and support for them is limited. WebGL is not supported for now due to its lack of compute shader capabilities.
- Meshes locked in Mesh Renderer Mode or exported from MudBun are just standard meshes and can be used without requiring MudBun at run-time, so they should be compatible on all platforms.
- Compute shader support is required.
- It is highly recommended to target hardware with dedicated GPUs, as MudBun uses compute shaders. It is not recommended to target hardware with integrated GPUs, unless MudBun is only used at edit-time to build meshes to be exported or locked at run-time.
- If you are not sure how MudBun runs on your targeted hardware, please try out the trial version first.
Limitations
- MudBun is intended and optimized for localized real-time volumetric VFX mesh generation with dynamic brushes. Sculpting and terrain editing with many brushes are possible but should be kept at a reasonable scale.
- Non-desktop devices (e.g. laptops, tablets, etc.) generally have weaker hardware than desktops and might not be suitable to run MudBun. It’s best to try out the trial version on your targeted hardware first.
- MudBun currently does not render in prefab mode. Unity APIs related to prefab mode/stage are still in flux. As a workaround, edit prefab instances in scene view and use the options accessible via the inspector panel to apply overrides.
- Scaling brushes might not work as users would normally expect. Due to the nature of signed distance fields, there is no general solution for non-uniformly scaled shapes. Non-uniform scaling is still possible for some special cases and sometimes through approximation. A brush’s local scales are usually not used as typical scales, but are interpreted as shape-specific parameters. For example, local scales are used as actual scales for box brushes, but are used as approximation for sphere brushes, and are interpreted as various dimensions like height & radius for cylinder & torus brushes.
Features
Here is a list of key features with more details below.
- Volumetric mesh generation & modeling.
- Real-Time Iteration.
- Built-in VFX & primitive brushes.
- Distortion & modifier brushes.
- Custom brushes.
- Brush groups (compound brushes).
- Render modes: smooth mesh, flat mesh, circle splats, quad splats, decal, ray-marched surface (experimental & URP only), ray-traced voxels (experimental & URP only).
- Meshing modes: marching cubes, dual quads, surface nets, dual contouring.
- Brush operators: union, subtract, intersect, dye, cull inside, cull outside, no-op.
- Brush materials.
- Smooth splat scaling.
- Dynamic voxel density.
- CPU-based script utilities for gameplay purposes: SDF evaluation, gradient/normal evaluation, raycasts, and surface snapping.
- Intuitive raycast-based click selection in editor (legacy gizmo-based selection still available as a per-renderer option).
- 2D Mode.
- Mesh collider generation.
- Mesh locking & auto-rigging.
- Mesh auto-smoothing.
- Automatic vertex welding of generated mesh.
- SDF texture generation (for GPU particle collision).
- Smooth corners for dual contouring.
- Render pipelines supported: built-in RP, URP, HDRP, and custom RP.
- Custom Unity shader graph nodes.
- Borderless voxel workspace. (*)
- GPU memory budgeting & auto adjustment.
Volumetric Mesh Generation
MudBun uses signed distance fields (SDFs) for procedural volumetric generation. A signed distance field is a function that takes a point in space and returns how far away the point is from the surface of a shape. When the value is positive, the point is outside the shape; when the value is negative, the point is inside the shape. This is a way to implicitly define solid shapes that might be otherwise difficult or impossible to express using explicit equations.
Real-Time Iteration
The effects are interactive in real time, both in editor and at run time. This allows rapid iteration.
VFX & Primitive Brushes
Each element that contributes to the final SDF is called a “brush”. There are 3 types of brushes: solid, distortion, and modifier.
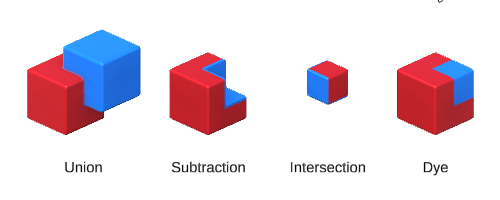
One of the nice properties of using SDF is that it’s easy to combine solid brushes with Boolean operations, a process also commonly known as constructive solid geometry (CSG). MudBun supports the following operations: union, subtraction, intersection, and dye (contribute material without changing geometry).
Further, these operations can blend brushes together smoothly.
MudBun provides several solid brushes geared towards VFX, including noise volumes, particles, and noise along simple curves.
MudBun’s noise volumes support 2 coordinate systems: Cartesian and spherical. Noise in Cartesian coordinates is sampled using the typical (X, Y, Z) coordinates. Noise in spherical coordinates is sampled using the (r, θ, ϕ) coordinates, where the first component is the distance from the brush’s origin. This is useful for creating radially-scrolling noise.
Taking the intersection of a scrolling noise in spherical coordinates with other shapes can create some interesting effects.
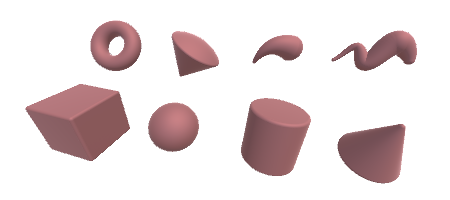
In addition, MudBun provides several basic solid primitive brushes, including boxes, sphers, cylinders, cones, tori, solid angles, simple curves (2 end points + 1 control point), and full curves (any number of interpolated points). They can be used to create various shapes.
Distortion & Modifier Brushes
MudBun also offers distortion and modifier brushes to further affect the mesh’s shape. Distortion brushes manipulate the positions of sample points, whereas modifier brushes post-process and change the values of the accumulated SDF.
Custom Brushes
MudBun provides straightforward means to create custom brushes. Users can create solid brushes with custom SDFs, as well as custom distortion & modifier brushes. Details on how to do this are described in the user manual.
Brush Groups
A brush group is a special type of brush that “isolates and collapses” the results of its underlying child brushes, and the resulting shape is treated as the brush group’s own shape as if it is a single brush. This is useful for creating compound shapes and use them for other Boolean operations.
Render Modes
There are four render modes: smooth mesh, flat mesh, circle splats, and quad splats.
The smooth mesh mode is for generating meshes with smooth normals. In order to generate the smooth normals, this mode needs to sample the same SDFs multiple times, so its performance is worse than the other two modes.
The flat mesh mode is for generating meshes with flat normals. It doesn’t need to sample the SDFs multiple times, so its performance is better than the smooth mesh mode. Depending on the user’s desired visual style, flat normals might be more desirable than smooth normals. Rendering flat meshes at low voxel density can create a stylized low-poly look to the mesh.
The splats modes are for generating splats at voxel cells. Think of it as a bunch of sprites scattered across the surface of the solids. The performance is similar to the flat mesh mode. Changing the sizes, facing, and textures of the splats can create various kinds of stylized looks. In circle splats mode, pixels outside of the circle areas are discarded, which don’t happen in quad splats mode. The quad splats mode is useful for applying rectangular splat textures while minimizing discarded pixels, but uses twice as many vertices as the circle splats mode.
Meshing Modes
There are four meshing modes: marching cubes, dual quads, surface nets, and dual contouring.
Marching cubes is the standard meshing mode, which provides a good balance between speed and quality.
Dual quads mode is cheaper than marching cubes and produces a blocky look. It serves as an intermediate results that can be further processed by the surface nets and dual contouring modes.
Surface nets is slightly slower than marching cubes, but has the added benefit of being able to smoothly blend with results from the dual quads mode.
Dual contouring is much slower than surface nets, but is the best out of the four meshing modes at preserving sharp features. It can be useful for in-editor hard-surface modeling. It also comes with the added benefit of being able to smoothly blend with results form dual quads.
Brush Materials
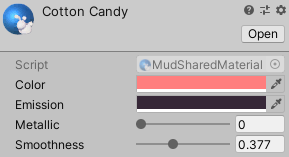
A brush is associated with a material. These materials blend together as the brushes are blended together.
Each brush has a material component, where the user can define the brush’s material in-place, or assign a shared material stored as an asset. Material properties that are blended include color, emission, metallic, and smoothness, which are typical physically-based rendering (PBR) properties.
[WIP Feature] Additionally, there is a special integer property valued between 0-3 that is “blended” differently. Each integer value corresponds to a weight, which is the value that is actually blended. The weight corresponding to the material’s special integer property value is set to 1, and the others set to 0. These blended weights can be used to blend among discrete properties, such as textures.
(TODO: Videos)
Smooth Splat Scaling
When using the splats render mode, splats are smoothly scaled up or down as they approach or leave, respectively, the solid boundaries of SDFs. This produces smooth transition and avoids pops (temporal discontinuity), especially when the SDFs are changing slowly and smoothly, such as slow-scrolling noise.
Dynamic Voxel Density
The voxel density can be dynamically changed at run time. Lower voxel density means less voxels and better performance. This is useful for targeting different hardware with different performances. It can also be used to create stylized transitions.
2D Mode
Mesh generation is reduced onto a two-dimensional plane in 2D mode. This mode is much cheaper than the default 3D mode and can be used for 2D games or faking 3D effects with 2D meshes.
Mesh Collider Generation
Mesh colliders can be generated, either added to the renderer itself or a new separate game object. The voxel density for generating the mesh collider doesn’t need to be the same as that of the renderer.
Mesh Locking & Auto-Rigging
The procedurally generated mesh can be locked in to become a standard mesh. There is also an option to auto-rig the locked mesh with brushes. This is handy for getting everything done quickly without leaving the Unity editor, and the auto-rigged mesh is ready for use with procedural animation tools like Boing Kit.
Mesh Auto-Smoothing
For the mesh render modes, there is an option to enable auto-smoothing, where the normals are smoothed based on a maximum angle tolerance. This is a feature often found in 3D modeling software and can be especially useful when performing hard-surface modeling under the dual contouring meshing mode.
Smooth Corners for Dual Contouring
There is a “smooth corner” option for dual contouring that applies smooth normals around sharp corners to create a smoothed look.
Render Pipelines & Shader Graph Nodes
MudBun supports Unity’s 3 standard render pipelines: built-in RP, URP, and HDRP.
Users can create custom MudBun shaders by using Unity’s shader graph tool for URP and HDRP. Input nodes for the mesh, splat, and decal render modes are provided. There are plenty of stock & preset shaders that can serve as examples.

MudBun’s default shaders for built-in RP remain handwritten to serve as ground truth.
Borderless Voxel Workspace
Volumetric solutions are commonly constrained within the borders of a dense finite voxel grid. However, MudBun breaks this constraint (*) by employing spatial hashing and sparse voxel trees. The user doesn’t have to worry about the constraints of a finite voxel grid when working within typical game settings.
(*) Technically, there is still a limit, but it’s much larger than a typical dense finite voxel grid. MudBun’s limit is a grid of 262k^3 voxels. If somehow the user needs to go outside this limit, it can be easily accommodated by shifting the renderer around, since the grid is relative to the renderer’s center.
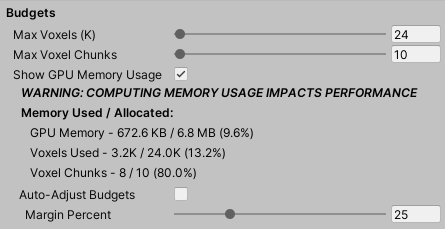
GPU Memory Budgeting & Auto Adjustment
MudBun offers straightforward interface for budgeting GPU memory, as well as diagnosing its usage. There is also an option to keep track of high-water marks and automatically adjust the GPU memory usage accordingly, with an adjustable margin percentage just to be safe.
Tech Resources & References
- Tech references used for Clayxels documented by Andrea Interguglielmi.
- Research project on ray marching and spatial data structures.
- The marching cubes, surface nets, and dual contouring algorithms.
- SDF primitives, operators and normal generation by Inigo Quilez.
- Dynamic bounding volume hierarchy in Box2D by Erin Catto.
- Spatial hashing based on GPU hash table by David Farrell.
- Noise formulae based on webgl-noise.